Nine Steps to Prepare Your Article
Here are nine important steps to prepare your article before publishing it on your website.
Sometimes people will sit down and start writing their blog articles directly into the New Post screen of their WordPress website.
There’s nothing wrong with that for a short article with just a few sentences, but I think you will achieve a much better result if you prepare everything before you even log in to your WordPress dashboard.
I believe these are the nine important steps to prepare your article before posting it to your website.
- Draft Your Article

Whether you prefer to start your article drafting process with a pad of paper and a pen or by sitting down at the keyboard, you will ultimately need your article in an electronic format so you can work with it easier.
I recommend drafting your article in a word processing program such as Microsoft Word or Google Docs. Word processing programs are designed with features helpful in preparing your article for publishing.
This article is not intended to be a tutorial about the intricacies of how to draft an article, but one of the basics is outlining your article to ensure you cover the main points relevant to the topic of your article.
For example, when I was drafting this article about preparing an article for publication in WordPress, I created an outline that included the main points I wanted to cover. These main points evolved into the nine steps.
2. Proofread and Edit Your Article
 Once you’ve drafted your article, you’ll need to proofread and edit it. And don’t forget to use the built-in spell-checking feature of your word processor.
Another powerful feature that word processors have is the ability to cut and paste. If you find you want to move text around to word it differently, you can cut a section and paste it wherever you want.
3. Format Your Article
Once you are satisfied with the content of your article, you’ll want to format it.
If you have a short article, you may not have any formatting to do. But if you have a longer article with multiple points, you’ll want to create relevant sub-heads.
For example, this article is a list post and each of the major items in the list is a sub-head. Sub-heads help to break up long articles into bite size sections.
Sub-heads also help to keep the article organized as well as making it easy for readers to skim to find the information they might be looking for.
4. Create a Compelling Headline

Once the body of your article is complete, you’ll want to create a compelling headline to attract people to read your article.
Whether your article shows up on social media or in search engine results, your headline is one of the two primary factors in compelling someone to click through to your article.
Keywords Are Important
You also want to make sure important keywords from your article are in your title whenever possible. And you’ll want them at the beginning of your headline.
If you’re not familiar with the concept, keywords in this context are defined as the word, or words, that that are highly relevant to your article.
Notice the title of this article: Prepare Your Article for Your Website in 9 Steps.
In an early draft, I originally titled it: 9 Steps to Preparing Your Article to Post in WordPress but I wanted the keyword phrase prepare your article at the beginning of the headline; because, that’s what this article is about!
This will help your article to rank higher in search results for searches using that term. It will also make it easier to see for the person who is looking for that phrase.
5. Select, Optimize and Upload Images for Your Article
Why use images in your article?
Images can be an important part of any article and have many uses in an article.
Images help to introduce your topic
The featured image at the beginning of this article was chosen because it reflects the overall topic of this article.

Images support your article’s content
Again, the featured image associated with this article supports the content, but images can also support sections of the content.
Notice the image I used at the beginning of 2. Draft Your Article section, as well as the image imbedded in 2. Proofread and Edit Your Article. Those images support the content of those sections.
Images break up your article’s text
Reading a lengthy article can sometimes be overwhelming, especially on a small screen device. Images can help to break up the text, making it easier to digest.
Here’s a random image to break up the text before moving on.

Images can also help to compel someone to click through from social media websites.
Select One or More Images for Your Article
There are a number of places you can get free or low-cost images for your articles.
They can be actual images of what you are writing about or they can be more abstract.
Optimize Your Image
Optimizing images may involve both resizing and/or cropping if needed, but also optimizing them for SEO.
Upload Your Image to Your WordPress Media Library
Once your image is ready, upload it to your WordPress website’s Media Library so it will be ready for your use when you create your article in WordPress.
6. Determine Appropriate Categories to Use
This is one of the easiest parts of preparing your article for publishing. Your website may only have one category so it’s obvious where to post it.
Many websites have multiple categories, depending on the nature of the website. Did you notice the categories I used for this article? They’re listed near the title of this article, but other websites may show them at the end of the article.
Categories help to keep your website organized. If you write about fishing, you might have a top-level category about fresh water fishing with sub-categories about fishing in lakes, ponds, rivers and streams.
7. Consider Post Tags to Add
Like categories, post tags can help organize your articles within groups. Using the fishing topic, you might create an article about fishing for trout in small streams in southeast Minnesota.
The category you post in might be Fresh Water Fishing/Streams but you might add the following post tags: trout, brook trout, brown trout, Minnesota, etc.
If someone should do a search of your site for trout fishing in Minnesota, any articles with these post tags in them will show up in that search.
Depending on how your WordPress website is configured, adding post tags may also add additional pages to your website; each post tag may have its own page that can show up on a Google search.
8. Create an Excerpt

Excerpt for this article.
In WordPress, the excerpt is an article summary or description. When you or someone else posts a link to your article on social media, it is usually the excerpt that is displayed below the article title.
This is also typically used for the snippet of text below the title in a Google search.
In some cases, when there is no excerpt social media sites and search engines may display the first few words of the article, which may not be what you want.
The article excerpt is another way to entice a reader to click through to your article.
Since you can control this description, why not have a compelling teaser when you post a link to your article on social media websites?
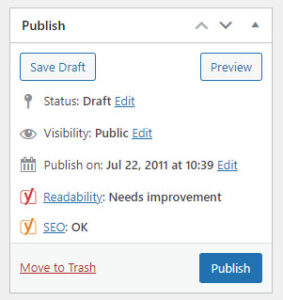
9. Publish Your Article
When everything is ready to go, log into your WordPress Dashboard, click on the Add New Post link and create your new article.
Since you have all of the pieces ready, all you have to do is copy and paste the Headline, article copy, post tags and excerpt from your word processor document into the appropriate locations in the Add New Post screen.
Then select the Category(ies) to post in, add your image(s) and you are ready to click Publish.
Publish Away
With these nine steps, you can prepare to publish your article without missing any of the important pieces.